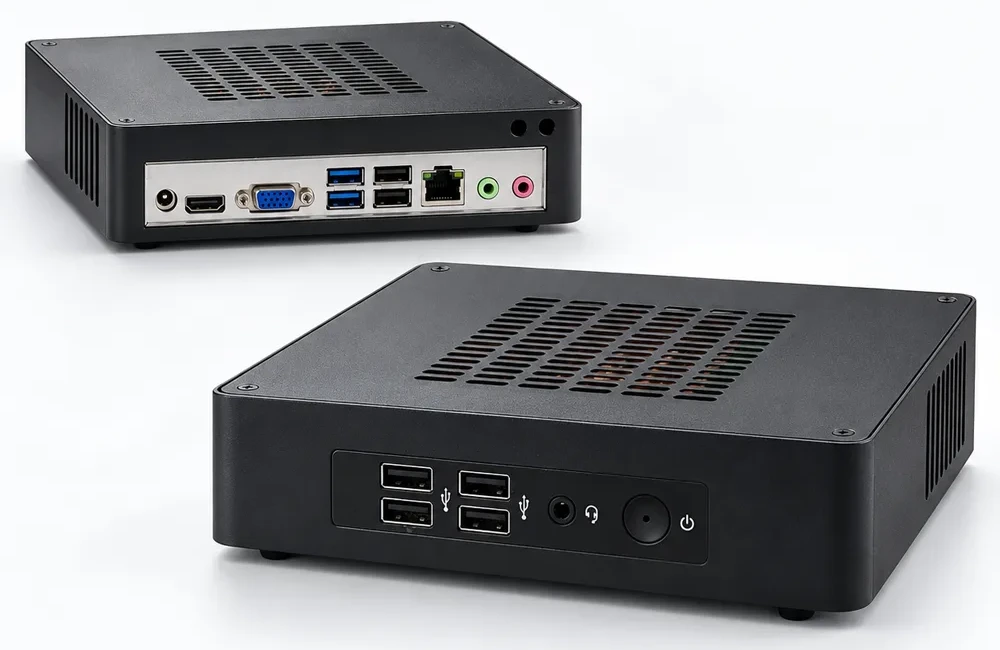
Connect the adapter to the DC 12V port on the PC. Connect the power cable to the adapter and a wall outlet, and check that all connections are secure.
4
Turn on the PC and set up Windows
Turn on the monitor and select the input you connected. Briefly press the power button on the front of the PC, then follow the on-screen Windows setup instructions.
Attaching the antenna
STEP 01
Align the connector
With the PC powered off, align the antenna with the connector.
STEP 02
Turn clockwise
Turn clockwise and tighten securely by hand.
Tighten by hand. Do not overtighten with tools.
Choose a suitable placement
Place the PC horizontally or vertically using the supplied stand. Keep the top and side ventilation openings clear.
Mounting behind a monitor with VESA
Disconnect power from the PC and monitor. Before mounting, check that the monitor’s VESA hole spacing, screw size and length, and supported weight are compatible with the supplied mount.
Secure the mount according to the monitor manual, then attach the PC securely. Keep ventilation openings clear and the antenna and power button accessible. Contact your seller if the attachment method is unclear.
02
PORT GUIDE
Front and rear ports
Identify the port using the photo labels and connector shape before connecting a device.
Front port quantities and uses
Port
Qty.
Connections and use
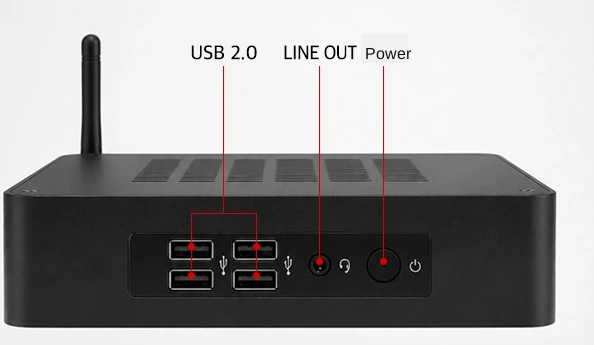
USB 2.0
4
Keyboard, mouse, USB receiver and storage devices
LINE OUT
1
Audio cable for headphones or external speakers
Power button
1
Press briefly once to turn on the PC.
The front LINE OUT port is for audio output. Connect a microphone to the pink MIC port at the rear.
Rear port quantities and uses
Port
Qty.
Connections and use
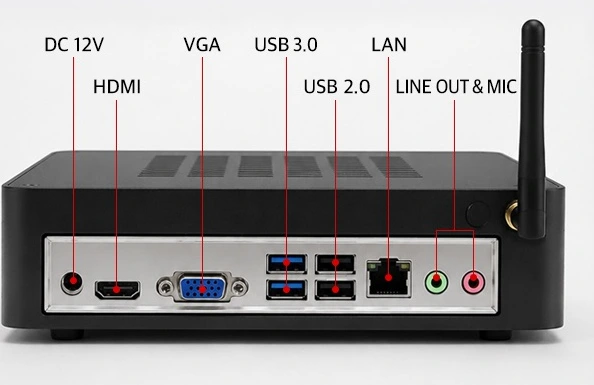
DC 12V
1
Supplied power adapter
HDMI
1
Monitor or TV with an HDMI input
VGA
1
Monitor with a VGA input
USB 3.0
2
USB storage and other peripherals · blue ports
USB 2.0
2
Keyboard, mouse and other peripherals
LAN
1
LAN cable from a router or network equipment
LINE OUT
1
External speakers or headphones · green port
MIC
1
External microphone · pink port
Antenna connector
1
Supplied wireless antenna
VGA carries video. A separate audio connection is required to use speakers on a VGA-connected monitor.
03
WINDOWS & CONNECTIVITY
Windows and connectivity
Windows 11 Pro is preinstalled.
01
When you first start Windows
Follow the on-screen instructions to set your country, keyboard and network. Have an internet connection and your account information ready for initial setup.
Set up your account for personal or work use. If the PC is managed by your organization, follow your administrator’s instructions.
Once the desktop appears, open Settings › Windows Update to check for updates. Keep the PC connected to power until installation and any restarts are complete.
Connect to Wi-Fi
Select the network or sound icon on the right side of the taskbar to open Quick Settings.
Turn on Wi-Fi and select your network from the connection list.
Select Connect and enter the network password. Open a web page to check your internet connection.
Connect a Bluetooth device
Turn on the device and put it in pairing mode according to its manual.
Open Settings › Bluetooth & devices and turn on Bluetooth.
Select Add device, choose Bluetooth, and connect the device shown in the list.
Connect to a wired network
Connect the rear LAN port to your router or network wall socket. Networks using automatic IP settings are normally configured after connection. Ask your network administrator for the settings if your workplace uses a static IP address.
Shut down safely
Save your work, then select Start › Power › Shut down. Do not disconnect power during updates or file saves. The power button’s behavior depends on your Windows settings.
Menu names and layouts may vary slightly depending on your Windows version and display language.
04
DISPLAY & AUDIO
Display and audio
Choose the display and audio output devices that suit your setup.
Connect a monitor
Connect the monitor using HDMI or VGA, then select the corresponding input on the monitor. Open Settings › System › Display to adjust resolution and scaling. Start with the values recommended by Windows.
Using two monitors
Connect the first monitor to HDMI and the second to VGA. Press Windows + P to choose a display mode.
DuplicateShow the same content on both screens
ExtendUse both screens as a larger workspace
Select Identify in Display settings, then arrange the screens to match your desk. Available resolutions and refresh rates depend on the ports, cables and monitors.
Audio output
Open Settings › System › Sound and select the output device for the PC’s built-in speakers.
Unmute the sound and start playback at a low volume. Check the volume in the app as well.
To play sound through your monitor or Bluetooth speakers, select that output device. Check your microphone under Input.
The built-in speakers have a stated total output of 10W. Connect a microphone or webcam separately for meetings. Device names may vary depending on the installed drivers.
A headset with a microphone may require a splitter adapter suited to its plug configuration. Use LINE OUT for audio output and the rear MIC port for the microphone.
USB peripherals
Connect keyboards, mice, printers and other peripherals to USB ports. USB 3.0 storage devices can use the blue rear USB 3.0 ports. Do not unplug a storage device while copying files. Use Safely Remove Hardware in Windows before disconnecting it.
05
TROUBLESHOOTING
Troubleshooting
Select a symptom and check the connections and settings in order.
The PC will not turn on
Check that the supplied adapter and power cable are fully connected to the PC, adapter and wall outlet.
Check the power strip switch and outlet, then briefly press the front power button once.
If the PC still does not work, contact customer support. Do not try an unapproved adapter or disassemble the PC.
There is no picture
Turn on the monitor and check that its selected HDMI or VGA input matches the connection.
Check both ends of the cable. If possible, test with another known-working cable or monitor.
If you are using two monitors, test with just one connected. When Windows is running, press Windows + P to check the display mode.
There is no sound
Check mute and volume settings in Windows and the app. Open Settings > System > Sound and select your preferred output device. Check whether audio output has switched to an HDMI monitor or Bluetooth device.
Check that the antenna is attached and Wi-Fi and Bluetooth are enabled. Check the Wi-Fi password, router or LAN cable. Also check the Bluetooth device’s battery and pairing mode.
If other devices cannot access the internet either, check the router or internet connection.
USBA USB device is not recognized
Connect the device directly to another USB port. If you use a hub, test without it. Check whether the device works on another PC, and consult its manufacturer’s instructions for any separate power or driver requirements.
PCThe PC is slow or unresponsive
Close unnecessary apps and check available storage and ventilation. If possible, save your work and restart Windows. If the PC is unresponsive, press Ctrl + Alt + Delete to check whether you can shut down or restart.
A forced shutdown or Windows reset may cause loss of unsaved work or data. If the problem recurs, contact customer support before resetting Windows or replacing components.
Intel Core i5-8350U 4 cores / 8 threads · up to 3.60GHz
Memory
16GB installed
Storage
M.2 2280 NVMe SSD 512GB
Graphics
Intel UHD Graphics 620
Operating system
Windows 11 Pro preinstalled
Wireless
Wi-Fi and Bluetooth supported
Built-in speakers
Total output: 10W (5W / 4Ω × 2)
USB
Front: USB 2.0 × 4 Rear: USB 3.0 × 2 / USB 2.0 × 2
Stated HDMI output
HDMI 2.0 × 1 4096 × 2160 or 3840 × 2160 @ 60Hz
Stated VGA output
VGA DB15 × 1 · 1920 × 1080 @ 60Hz
LAN / audio
LAN × 1 · front and rear LINE OUT × 1 each Rear MIC × 1
Power
DC 12V input · use the supplied adapter
Placement
Horizontal / vertical with stand / VESA
512GB is the manufacturer’s stated capacity. Capacity shown in Windows and available space may be lower due to the operating system and installed files. Before upgrading components, confirm compatible specifications and the procedure with customer support.
07
CARE & SUPPORT
Care and support
Basic care and service information for continued use.
Placement and power
Keep the top and side ventilation openings clear. Do not place the PC in an enclosed space or on bedding.
Keep the PC away from moisture, direct sunlight and heaters. Do not touch the power plug with wet hands.
Use the supplied adapter. If a replacement is needed, confirm its voltage, polarity and connector specifications with customer support.
Do not pull cables or trap them between furniture. Align connectors correctly and connect them without excessive force.
Cleaning and data backup
Shut down and disconnect power before wiping the exterior with a soft, dry cloth.
Do not spray cleaner directly onto the PC or insert objects into ventilation openings.
Disconnect cables before moving the PC, and pack it to protect it from impact.
Back up important files regularly to external storage or another separate storage location.
Stop using the PC if you notice a problem. If you notice a burning smell, smoke, unusual noise or a damaged power cable, disconnect power if it is safe to do so and contact support. Do not turn the PC on again if liquid has entered it. Consult customer support for repairs or component replacement.
WARRANTY1-year service warranty
Free service is provided for product faults arising during normal use for one year from the purchase date.
Before contacting support
Model name and serial number
Purchase date and proof of purchase
Symptoms, timing and error screenshots
Connected devices and usage environment
Contact your seller or KERNEL & CORE customer support. Warranty eligibility and repair procedures will be explained when you submit your request. Back up important data before sending the PC for service.